Pages

Showing posts with label rv modifications. Show all posts

Sunday, September 12, 2021

Raindrop Miscellaneous MODS&Fixes

 Lyn Brown, one of the Faceborg Group Bushwhackers, reminded me that I'm not done describing work we have done on Raindrop, the Bushwhacker Plus 15FK. Hence this catch-all Post so here goes with no particular order.

Oh! Lew performed the first MOD fifteen minutes after we pulled in the driveway. That absurd backboard thingy across the back end of the bed had to be gone soonest:


Much better:


When using shore power why not use a quiet smooth electric heater? Indeed, so we installed a permanently mounted and hard-wired Broan 1500W 120VAC heater. Amazon haz 'em:

Broan model 174 wall heater


One additional detail. The installation manual calls for 6" clearance from the floor and our install provides just 3". As such the floor in front of the heater gets warm because the louvers on the grill are aimed downward. I bent each louver straight so air flow is now horizontal.

And one further detail. Lew ran a piece of Romex from the new heater to a junction with the A/C circuit (it being a safe bet no one will run the two together). The yellow Romex is from the AC breaker panel to the A/C outlet. The white Romex is routed under the bathroom and around the corner to the heater.


These TTs come equipped with stabilizer jacks on the rear corners only and experience has taught us you need all the stabilization you can get so Lew went shopping for a pair of OEM style B.A.L. stabilizer jacks. Early in the Summer pandemic shortages meant paying a fortune to an eBay merchant but Bezos now has them back in stock (albeit still for a princely sum):

https://www.amazon.com/BAL-23026-Tent-Trailer-Stabilizer/dp/B000V9ATEW/ref=sr_1_22?crid=39AKHCI25IOX5&dchild=1&keywords=bal+leveler+for+pop+up+camper&qid=1633864705&sprefix=BAL+%2Caps%2C199&sr=8-22

Here they are installed. A nice sharp drill bit is an asset because the frame is some high-tensile-strength alloy:


These trailers come with a single step and because they are built with high ground-clearance the first step is a big one ...... too big for us Olds. Bezos to the rescue, a two-step direct bolt-on replacement that took few minutes to swap out. 

Holy price-gouging, Batman! Again, available for a princely sum:

https://www.amazon.com/Stromberg-Carlson-SMFP-2100-Manual-Flexco-24/dp/B00T36HGYK/ref=sr_1_11?crid=14ZCQ7Y183FX&keywords=Stromberg-Carlson+sfmp2100&qid=1690824183&sprefix=stromberg-carlson+sfmp2100%2Caps%2C479&sr=8-11

And here it is:


Although cute the OEM window blinds are NOT light-tight so they and the absurdly heavy valences had to go. Jan whipped up a pair of quilted simple roll-up window covers (with a layer of ironing-board insulation in the center):


And along these same lines the door window received a [removable] quilt-art light-blocker as well:


We purchased a 50AH LiFePO4 "Lithium" battery and installed it under the bed. This 12# battery produces the same number of AH output as a so-called 100AH SLA battery because LA batteries must not be discharged more than 50% to avoid battery damage.


We've since added a second [identical] battery in parallel so now have an effective 80AH capacity:


A battery circuit-breaker/disconnect-switch is part of the installation:


Removing the OEM battery from the tongue created space for secure storage of the Stinky Slinky (RV sewage drain hose) and a pile of "Lego-block" leveling blocks:


A 5" vinyl fencepost cover (painted black) was used for sewer hose storage:


Early on Lew discovered this kink in the freshwater tank vent pipe which would make filling the tank difficult if not impossible:


A fix was done while doing the bathroom MOD. Two 90 degree brass elbows were employed, one visible from underneath:


And one visible inside under the toilet (the white hose a bit below center in the pic). Oh, and visible as well in this pic is the cover over the OEM blackwater tank outlet:


The removal of the black tank meant removing all the exterior underneath plumbing seen in this pic:


Theis remaining 1.5" drain line from the gray-water tank:


Was fitted with a valve and a 3" RV hose fitting:


As-built the sink-trap uses up much of the storage space under teh sink so Lew fixed that with a waterless trap, again courtesy Bezos Inc:

https://www.amazon.com/HEPVO-BV1BUB112-1-1-2-Trap/dp/B00NLMPLDU/ref=sr_1_2?crid=31GS1PHC051YL&dchild=1&keywords=waterless+sink+trap&qid=1633871240&sprefix=waterless+sink%2Caps%2C188&sr=8-2


Before pic (also showing the Camco water filter we installed):


After pic showing much improved storage space:


Speakina' storage, Lew changed the cupboard hinges so the door opens upward against the ceiling instead of sideways as a head-banger (voice of experience speaking) Also a shelf added for organizing purposes:


 Speakina' shelves we added (and stained to match) the shelf to the right of the cupboard. It is attached with blocks screwed into the cupboard and into the rear OEM shelf:


Speakina' organizing, these Sterilite containers fit through the outside access door:


Another storage solution. The passenger-side bench lid is removable to gain access to storage space underneath. Lew screwed the lid down for strength (because cantilevering the bed extension) and created a hinged lid for better access to the storage. This pic shows the hinged lid and the cantilevered extensions to the original bench, both width ways and lengthways:
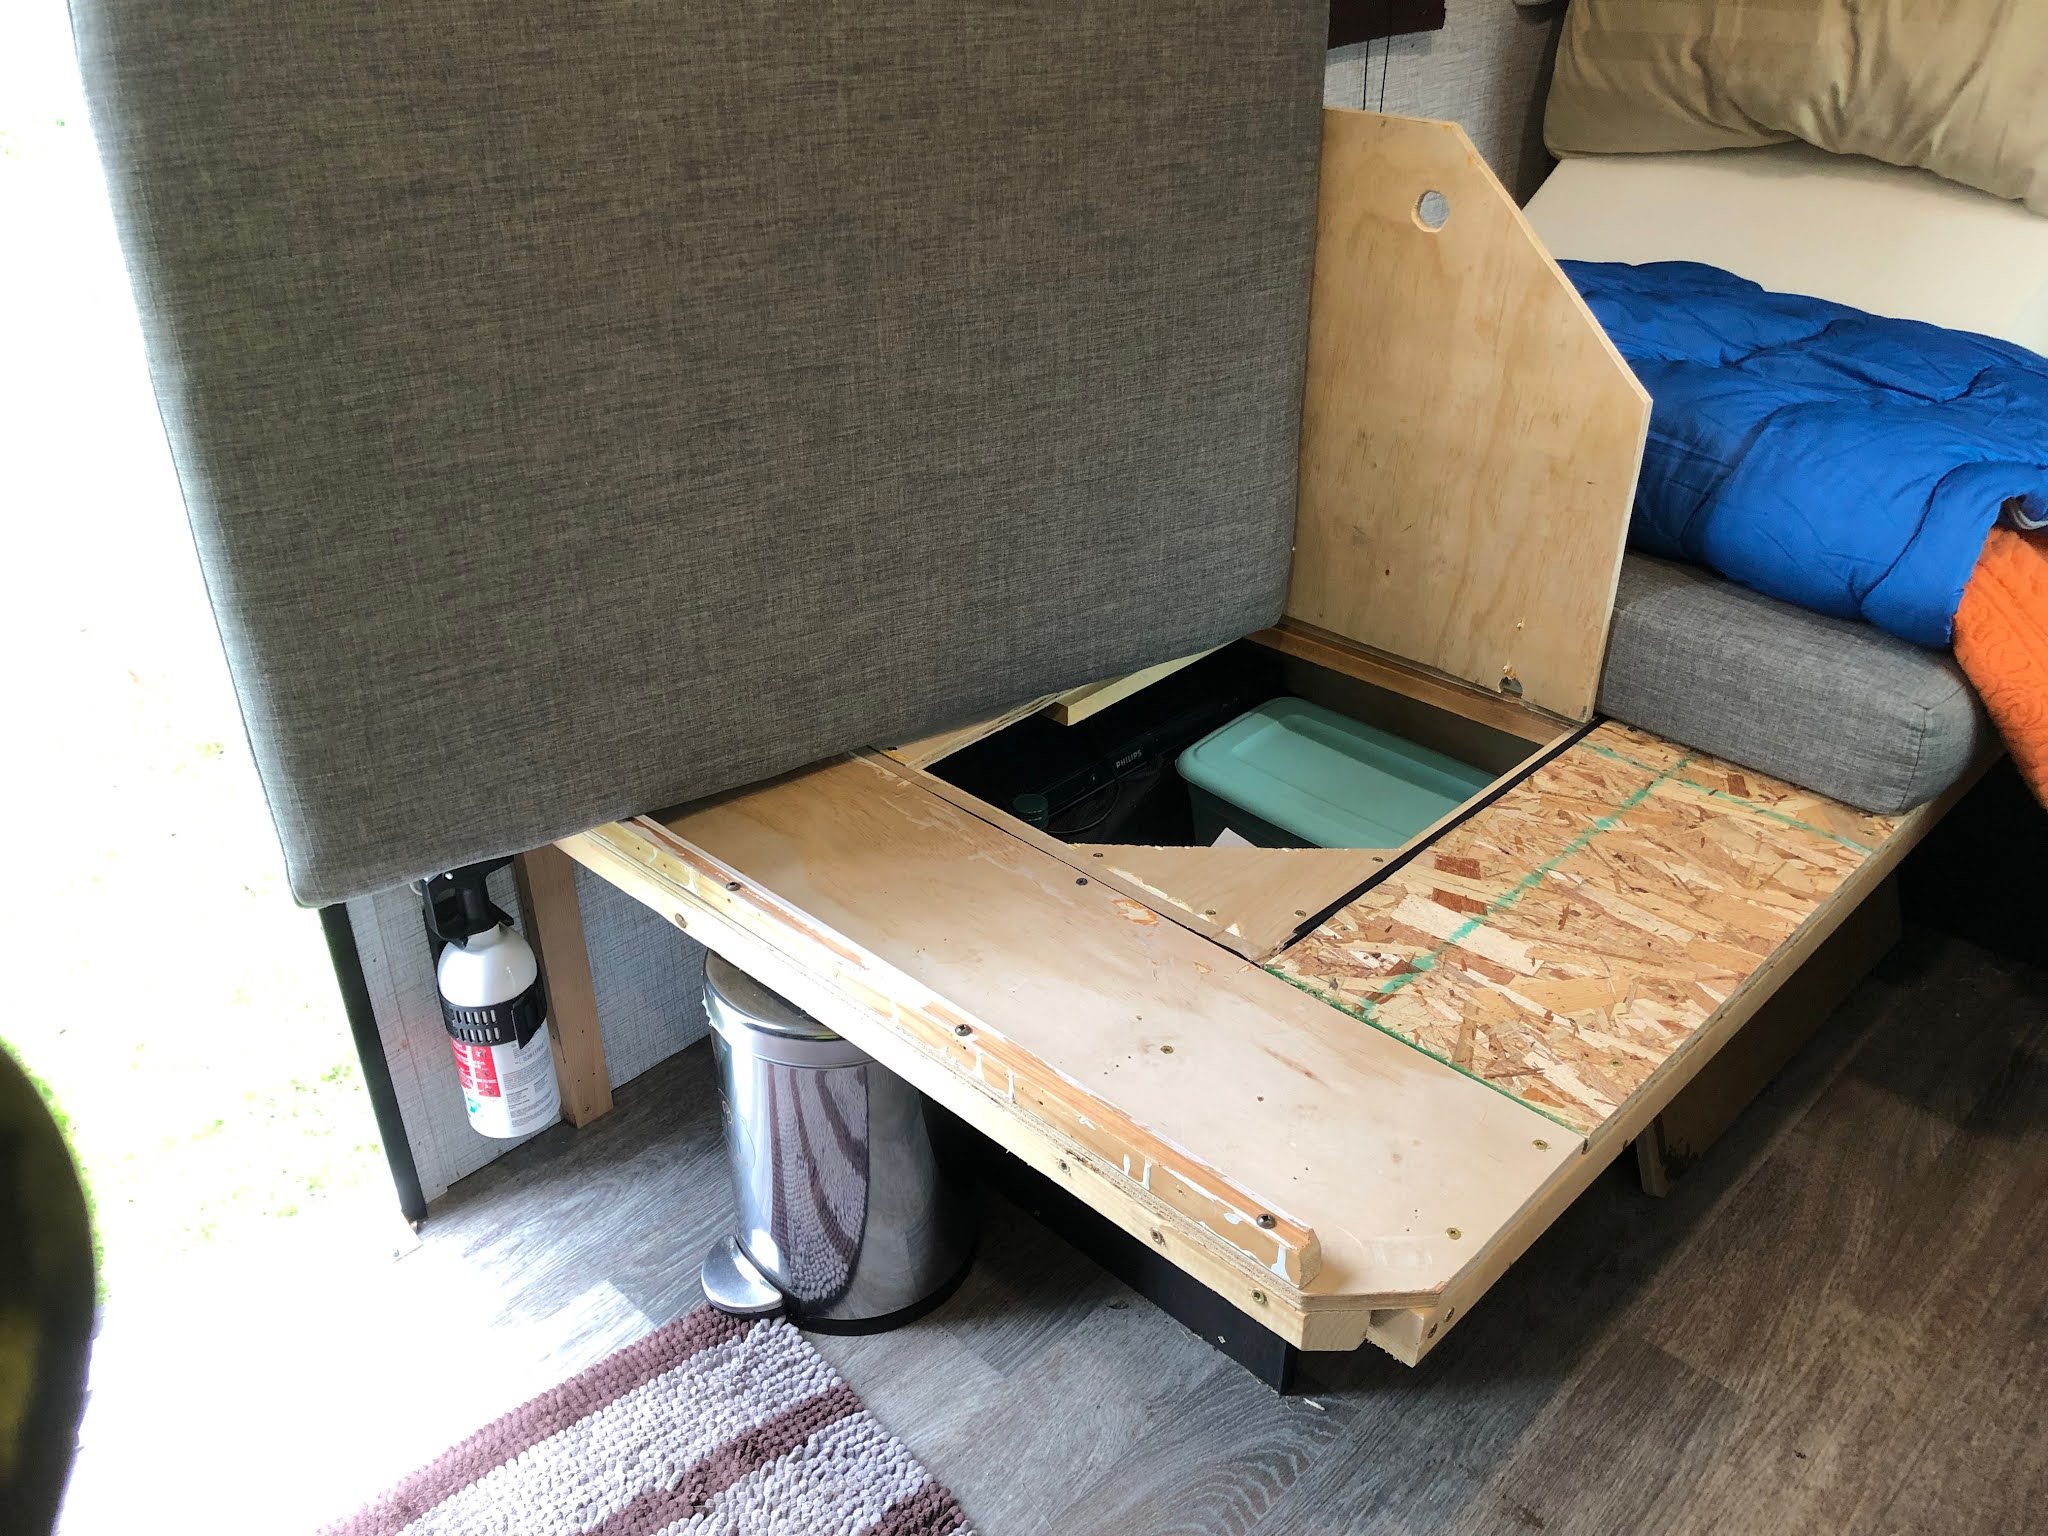


Well, that's it for now but it is a work in progress, this matter of getting the most for the least. 


Friday, September 10, 2021

Raindrop Shakedown or Learning by Doing

    Or Life in Eighty Square Feet. This new "Tiny Home" is really tiny and every little thing must be just right in order for two [old] people and a dog to live in it. Yes, accommodations peculiar to aging are especially part of the picture. Plus RoVing in the age of Covid has added it's own strictures&needs. Being who we are we pretty much dove in, bought this thing and then went to work making it fit us like a shoe.


STAGE ONE MODS, THE BATHROOM:

Our first trip to Pittsburgh illuminated some problems. For us Covid means NO public bathrooms so Raindrop's bathroom got a workout .... and bugs were revealed. Five days&nights saw the 8.5gal toilet tank full to the brim SO a definite limitation to boon docking/driveway-mooching. Being a "wet bath" (with the toilet tank under the toilet above the floor) meant the toilet seat was too far above the floor for petite-sized Jan to sit comfortably. Additionally, as delivered the toilet wobbled about like a canoe on waves. Also, the [waterproof] plastic bathroom walls were poorly attached and caulked. Once back home Lew went to work.

The first task was exposing the cause of the "wobble" problem. 


Toilet and floor removed:


The toilet flange was simply screwed to those two pieces of loose plywood resting on top the black tank thus revealing the reason for it wobbling about. The black plastic tank is thin flexible polyethylene plastic, NOT suitable for load-bearing:

With zero clearance between the black tank and the [outside] wall there was no way to support and stabilize a plywood deck (for the toilet to rest on and be attached to) between the plastic shower floor and the black tank SOOO the decision was made to gut the bathroom and fix it all.

Down to the floor:


False-wall removed:


Lew had figured out that a solution to the several issues would be a home-made macerating toilet emptying into the under-floor 19 gal gray water tank, (the same setup in principle as used almost universally by boat people). Because boat toilets pump flush-water  from overboard a land-locked version using on-board pressurized water for flushing was designed and constructed.


A standard RV toilet was used with an off-the-shelf Jabsco Macerator Pump (we've used one of these for years to pump wastewater through a garden hose) mounted beneath and communicating with the toilet outlet:


Suitable blocking was attached to the floor and the toilet/floor/pump assembly was mounted to it. The black pipe lower left communicates with the under-floor graywater tank:


Not yet coupled in this pic, the 1" clear vinyl hose connects the macerator pump to the fitting seen lower left in the pic, thus connecting the toilet to the 19gal tank under the floor:


An old bifold closet door was trimmed down and repurposed as a bathroom door:


It all works beautifully as planned. Before use the toilet bowl is partially filled with water by stepping the pedal partly down. After doing one's business the foot pedal is stepped clear down, which action opens the ball valve flushing the bowl contents into the toilet base whereupon the macerator pump draws and macerates the contents and pumps the effluent into the wastewater tank beneath the floor. This switch activates the pump when the pedal is depressed the last inch:


 The toilet is now solidly mounted with the seat at a suitable height and nineteen gallons of wastewater storage is available. The plastic walls have been removed and discarded. There is now a storage shelf and a clothes hamper behind the toilet:


As any RoVer knows a commodious clothes hamper is a delightful thing (I can barely reach the bottom):


STAGE TWO MODS, The Bedroom:

Our Pittsburgh friends visited for several days and we used Raindrop as our bedroom. A serious problem evidenced itself. The bed/lounge space measured 78" wide and only 70" long so we had planned to sleep crossways BUT with Lew in front (old-guy nighttime bathroom access) that trapped Jan who at this stage needs the same access. Hmm. Study revealed that removal of the OEM fridge would permit an extension of the bed space enabling the creation of two 32"X78" beds with an [all-important, (remember old-er people with arthritis)] access isle-way between. Oh, in addition there would be a proper bed between our two pillows for Buffy. 😍 So Lew went to work.


Out with the fridge and it's cabinet:


Then covering the fridge exterior vents (secondary benefit of the MOD, no more campfire smoke sneaking inside our living space):


Framing was built cantilevering the beds thus providing foot space in these tight quarters (stiff sore feet don't twist about like when one was 18):


We were able to reuse the OEM cushions, a definite plus:


Ready for a good night's rest with equal access for all three of us:


Lew was able to develop the remaining space where the fridge had been into much-needed [organized] storage; the drawer plus four 10"X11" wicker baskets:


And reusing the OEM mounting hardware there is even space for a small table large enough for two plates and two glasses:


STAGE THREE MODS, THE KITCHEN:


The OEM microwave oven was removed along with the OEM gas cooktop. The countertop was then raised 4" (to a standard 36" height). Into this space was fitted a 12VDC fridge w/freezer compartment. 


Amazon haz 'em.


Sausage being made (partially installed)


Finished. The door opens either way without modification. It has a tiny separate freezer compartment.


Without the OEM gas cooktop we use an electric induction cooker, a single-burner gas camping stove, or both.


These induction cookers are the bees knees 
for camping [with shore power] because
 all the heat goes into the pan with almost no waste heat.


Inexpensive and lightweight, these little stoves
 have click-ignitors and run on 
either butane or propane.


Oh, and while we were at it Lew removed that obnoxious head-cracker "cupboard" above the countertop, seen at top right in this pic: